DIY Pool Paint Application Overview
&
DIY Help Videos
A Tough and Durable 4-LAYER Epoxy Pool Paint
Page Index
- Get A Quote for a DIY PACKAGE
ALWAYS READ oUR APPLICATION INSTRUCTIONS - A FEW TIMES !
NB: This page and DIY videos ARE NOT replacing our detailed application instruction document, this is just a quick overview.
Please download the complete instructions from our downloads page section, you can login here and/or request that we e-mail it to you - click here.
We sell DIY Pool Paint packages country-wide with excellent feedback and a 99.9% success rate. In fact, the few failures reported over the years were all due to circumstances like weather interference, a clever handyman following his own methods, or instructing the garden engineer to handle the application alone, etc.
Stay humble, follow our step-by-step instructions although it might feel like baby steps, you will be successful!
The success of the DIY job will depend solely on your commitment to thoroughly read and follow our detailed application instructions document. Over a period of 22 years, we have perfected our methods to minimize the chances of failure.
What are the advantages of using Pool Solutions' Epoxy Coat System?
1. One water-repellent Primer. For marbelite, cement and concrete surfaces, Pool Solutions' special primer offers deep penetration and high bond-strength to all concrete, cement or marbelite surfaces. Our special and optional Wet-Smart primer can be used to apply on damp/wet concrete/cement/marbelite (Primer is not required on fiberglass linings).
2. Excellent compatibility between Primer and Top-coat. Total layer bond-strength on concrete were tested to the point of substrate breakage at 250psi (1.7MPA). On stronger surfaces the paint layer (primer and top-coat) reached 400psi (2.8Mpa) pull strength before breakage of the epoxy layer.
3. Non-blushing. Pool Solutions' top-coat epoxy is a very modern non-blushing technology product that does not require induction times (stabilisation period) once mixed. It is applied immediately after mixing, saving valuable time to beat the weather. (Blushing on older technology epoxies refers to the white wax-like substance forming on top of the coating when in contact with moist in the air or during filling of the swimming pool causing white streaks and loss off gloss).
4. Rain-safe within 3 hours. Pool Solutions' top-coat has been tested to be "rain-safe" within 3 hours after application (at 20 deg C) even quicker at higher temperatures. Any rain on the coating after this time will not affect the gloss or colour of the coating.
5. Maximum lifespan with three top-coat layers. Pool Solutions' one-layer saturating primer followed by three top-coats ensures maximum thickness can be achieved with the top-coat layers. It is the top-coat thickness of any coating that ensures that a maximum expected lifespan can be achieved (more layers can be applied as well).
6. All layers can be applied over a two-day period. Primer is applied and left to penetrate and cure inside the substrate overnight. The next day top-coat layers can effectively be applied on the same day without sanding in-between layers, especially during warmer temperatures above 20 deg C. The user may however decide to let coatings dry overnight, sand by hand and over-coat at a later stage, the next day or even a week or a month.
Why a Primer layer for cementitious surfaces?
You might ask why our methods utilizing a 4-layer system is more complex than single component paints or one-layer epoxy products? Certain products are advertised that it doesn't require a primer coat.
In general, the thicker the epoxy layer, the longer the lifespan of the coating which is we promote a three-layer top-coat system. The higher viscosity of a thick top-coat product offers less penetration capability into the cementitious substrate. A thick topcoat epoxy paint just doesn't offer deep penetration into any substrate. The better the penetration strength of the epoxy into the substrate, the less chance of delamination. Penetration and bonding strength is the main factors offered by a primer coat. This can only be achieved utilizing a lower viscosity and specialised concrete/cement primer. Following this, the primer should be compatible with the Topcoat layers to create a bond with the thicker topcoat epoxy layers, not to suffer inter-layer de-lamination; makes sense, doesn't it?
Our epoxy system consisting of a specialised industrial-rated concrete/cement primer, combined with the three top-coat layers. We tested teh epoxy coat was tested up to 400Psi (Pounds per square inch) or 2.8Mpa (Newton per square millimetre) bond strength to marbelite, concrete, cement and fibreglass surfaces - (normally with substrate breakage) - we rest our case!
Because of our tested system and methods we can offer a full product replacement guarantee, even to DIY customers.
A Few Pointers - in Short
Remember that the epoxy pool paint is a relatively thin and hardened decorative layer, if the pool surface is brittle or the old marble plaster is de-laminating, don't use this product to keep it all together. First ensure that the underlying surface is properly repaired or if necessary, re-plaster the swimming pool and paint later.
- Do a proper pre-inspection of the pool surface to identify and rectify any underlying problems beforehand. See our video on pre-inspection to eliminate possible moist penetration (reverse osmotic pressure) from outside that can compromise the penetration and bonding of the epoxy paint. We offer a primer that offers bonding on damp/moist substrate but if water flow is noted through the structure, we recommend using a moist barrier like PCT56 (available from Pool Soluti9ons) to further damp-proof the structure, especially on new concrete and cement plastered pool surfaces.
- Always use an electric drill equipped with a paint mixing tip to mix the Epoxy Part-A with Part-B. Round sticks just don't seem to get job done properly.
- Mix the A-component separately first (especially the Topcoat-A-part). Measure the A and B components in small quantities i.e. 3 Litres (2L A + 1L B) and thoroughly mix for at least 3 minutes.
- If you don't properly mix Topcoat-A with Topcoat-B, dilute it or mix it with another substance.... well, anything can happen. We have had angry clients who told us that our product isn't working; "The epoxy is still wet after 14 days!".
Well, this is literally impossible, epoxy curing technology is a well-tested science. If thousands of our client's applications cured within a day, and yours didn't, be humble and call us to enquire how to remove the sticky stuff. We might be so kind to offer replacement product at cost to you. Removing that uncured sticky stuff is something we don't whish for anyone, not even our enemies.
- So, you have mixed Topcoat A with Topcoat B - keep the product preferably in a small bucket with a handle and keep it in hand during the painting process. Paint trays is not a good idea in a swimming pool and placing it down on the floor or on the paving surfaces will reduce the pot life significantly due to heat transfer into the thin layer of epoxy in the tray.
Once products have been mixed, don't go to the toilet, don't drink coffee, you might end up with a smoking bucket changing into a something hard and solid ...
however, if it does happen to you, remove the hardened, moulded object from the bucket. Use is as a door-stopper or a small children's chair, at least you will be the only person with such an amazing thing!
Painting is the easy part, anyone can do it. You can test this fact; just stop next to road where the job seekers are gathering in your area and ask if anyone of them can paint a swimming pool, in a blink of an eye, you will have ten professional painters inside your vehicle and maybe even few on the roof!
See... anyone can paint.
Remember to keep an eye on the sky, you don't want to be interrupted in the middle of the job by a rain storm. Mixing wet epoxy with water can become messy. If in doubt, wait until the next day. Visit www.weathersa.co.za for a sometimes totally misleading weather forecast.
Another "good" weather site that can give you the forecast for different hours of the day is: http://www.wunderground.com/, (search for your area).
There are two options available to you to get the job done:
1. If you are working alone and have a relatively large swimming pool, follow our normal 4-5 day process as indicated in our application instructions and overviewed below.
2. If you have some help or you can get the wife and kids to help, you may consider the two- or three-day process described below. Always study our application instructions to avoid the many pitfalls.
Primer (bonding layer)
Applicable on marbelite, cement, concrete or gunnite surfaces (not fiberglass). For this first day of painting you will have to get out of bed, preferably before 12H00 PM. Begin early, you will have to grind or sand the swimming pool surface in preparation and apply the Primer coat on the same day (of course, the Primer can be applied on any day after preparation). The earlier the better, for in case some rainy weather occurs in the afternoon.
- After grinding the pool surface slightly with grinders and P16 Fibre disks to obtain a clean, dry surface, (marbelite pools) a primer liquid is used to properly wet the pool surface. This can be done by using a splash brush (builders brush) or using pesticide hand pump sprayer. You may even roll the liquid on with paint rollers to penetrate and saturate the surface. Click on the DIY help video link to see how the grinding is done. (Fibreglass linings need only to be sanded well by hand using 60 grit sandpaper to scourged the flow coat layer, no primer is required)
- The first coat (Primer) is left until the next morning to penetrate and cure inside the cementitious surface
First Top-coat
- The next day, sand the whole surface (also applicable for fiberglass) by hand to remove any to ensure a good mechanical bond. Sand the whole surface with 60 grit sandpaper. On fiberglass lionings we recommend using a large grinder equipped with 60-80 grit flexible grinding discs (use 60grit sanpepr in die corners).
-
Mix Topcoat A and B in manageable quantities and in correct mix ratio as per instructions.
- Verify the mix ratio on the side labels of the cans. If you are two or more, you may add Part-B directly to Part-A and mix with en electric drill and proper paint mixing tip. Round sticks doesn't mix epoxies well (it's in the manual, as well as a few other tips).
- To mix smaller quantities, first stir the contents of the Part-A component first before measuring out using a measuring cup of some sort and follow the mix ratio indication on the label.
- For the long method, leave the first top-coat to dry overnight. It might take two days during cold winter months.
Second Top-coat
- The dried and glossy first coat MUST be sanded thoroughly to remove to break the gloss for a better mechanical bond.
- Start painting in the deep-end and work your way to the shallow-end and the steps. Oh, I'm sorry, I should have told you this in the beginning so you don't paint yourself into a corner in the deep end - sorry!
- Remember to check for contamination around the pool on the paving and even on the inside edge of the coping stone. We have seen some "professional" painters hanging unto the edge with a hand full of epoxy while painting the walls with the other hand. Remove all contamination immediately with methylated spirits or paint thinners.
(Keep the spirits close at hand while watching them paint, spirits tend to disappear when left alone and the workers may become less proficient.)
Third Top-coat
By this time you should be an experienced weather man. This is your final finishing coat and you don't want it ruined by rain. Select the best of the best of the "professional" painters you might have hired. Repeat the procedures as with the second top-coat.
Enter the pool with bare feet the next day and feel for sharp edges etc. Remove by sanding any sharp edges away. Leave the epoxy to harden for three days before filling the swimming pool with water.. during colder temperatures, leave the pool to dry for up to 7 days.
Add the pool cleaner and chemicals after testing the water balance. Especially have the water tested against too low Calcium Hardness. This will corrode the paint layer and cause excessive chalking shortening the lifespan of the product if left unchecked. Calcium Hardness (also called Total Hardness) should be lifted to read between 400ppm and 500ppm by adding calcium flakes (available from Pool Solutions or your nearest pool shop). You will probably need 5kg per 20KL water depending on pool size and start-up readings. Download our Pool and Spa Water Treatment E-book, see page 11, 33 and 34 to calculate the required quantity Calcium Chloride that will be required for your swimming pool.
This method can be followed if you have a small to medium size swimming pool, especially in the summer months when curing times of the product will be at a minimum. If your wife and kids seem confident and have rehearsed the process well the previous evening, you might consider a family effort.
Decide beforehand who will be the supervisor, who will be the mixer, who will be the roller-painters and who will be the brush-painter. This process will require good timing and organizational skills.
For larger pools, you will perhaps require an extra helper and the use of spiked paint shoes to walk on damp, wet or sticky coatings. (Enquire from Pool Solutions)
First day
On the first day of the project, do the emptying and preparation as described earlier, grinding, patching and cleaning the pool. Apply the Primer (not required for fiberglass linings) Download our full application instructions for more details.
Applying more than one Top-coat on the same day
You need to be a weather prophet to successfully complete the project on the second day. All three layers of epoxy top-coat epoxy can be applied on one day without the need for sanding between layers, as is necessary with the longer method. You may also opt to apply the first two top-coats on one day and leave the final coat for the third day.
You will need a plastic drop-sheet on the paving near the steps to protect the paving against contamination. You will require 150mm Mohair rollers, two per worker. These rollers are to be fitted onto telescopic extensions available from hardware shops or paint shops. The extensions will press-fit into the roller handles so the second, third and fourth coat can be applied from outside the swimming pool. Alternatively the swimming pool can be entered on Spiked Paint Shoes from the second coat onwards. (Available from Pool Solutions)
Whoever is going to do this will need to walk on slippery-wet top-coats. If the previous coat is still quite wet, you might see a view splits and other acrobatic balancing acts. Keep the video camera at hand! We've seen people pulling the painters out of the deep end with ropes bound around their waists. Don't wait too long (longer than 3 hours in summer) before over-coating on the same day. If the first or second top-coat has become very sticky, you might see people walk on tacky glue and losing their shoes. If this happens remove the shoes at all cost, you don't want permanent ornamentals stuck to the bottom.
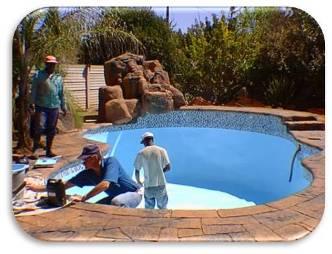
 Unlike the applicators in the picture, lowering their colleague into pool to complete the final coat, you may opt using shoes with smooth soles to walk on the wet and sticky coat. Use gumboots of which the soles have been grinded smooth, or bind strong plastic bags around the bare feet. Alternatively and ultimately, we also offer Spiked Paint Shoes that can be strapped to normal shoes. Walking on 25mm spikes makes the job much easier and less slippery.
- Once any layer has completely hardened or have become like a stiff gel, proper bonding between the layers will be compromised if over-coating is attempted.
Hardened epoxy layers must always be sanded before applying an overcoat.
- Over coating wet/damp top-coats will result in "fusing" of the layers, creating a very solid layer of epoxy.
- Don't apply too thick, especially in the winter to prevent sagging or teardrop running marks overnight.
- Check for any spots that were skipped and touch up with top-coat epoxy.
- You can deviate at any point between layers to follow the longer procedure
- After application of the primer and the first top-coat the next day as per instructions, monitor the top-coat epoxy applied for approximately 2 hours. As soon as it seems that the applied top-coat are not too wet or slippery for the rollers to become "roll able" again, apply the next (second top-coat) using rollers fitted on extension poles if you intend applying from outside. (For larger swimming pools you may require spiked paint shoes).
- The last (third top-coat) can be applied on the same day as soon as the previous coat appears sticky/wet (not touch-dry). Alternatively you may decide to leave the first coats to completely harden overnight (during summer temperatures). You will then need to sand the hardened coatings by hand (60 grit sandpaper) the next day before applying the next top-coat.
- Remember, if you take too long to apply the mix epoxy, the mixed product will start to set in the bucket and will lose it's bonding strength and will become too stiff to apply properly. If in doubt, rather mix smaller quantities at a time and apply in sections. The final coat must however rather be applied in one continuous application.
- If you are applying all three top-coats on the same day, use 150mm Epoxy Pile rollers (available from Pool Solutions) or alternatively white Mohair rollers fixed to the extension poles and apply the final coat while walking around the edge of the pool. Use proper sunglasses to examine the applied layer to see if any patches were skipped. Re-apply where necessary. If you are using Spiked Paint Shoes, the application can be done by entering the pool walking on spikes and on the wet pervious layers.
- After applying the layer, let the painters start from the deep end again and "roll" the layer again with the same rollers, but not applying new paint. This will ensure that teardrops will not be forming due uneven coating thickness.
- Monitor the layer again for approximately 2 hours until it becomes "paintable or roll able" again. For the all-on-same-day process, do not let the previous layer dry too long and become hard and glossy. If this happens, rather leave the layer to completely dry overnight, sand it thoroughly the next day to create a good bond and proceed with the next coat. Use this time to remove any contamination and to inspect the surface for spots that were missed. Apply paint per brush along the tile edges. The painters might have to lie on the edge of the pool to do this :D
This task can also be done by one painter while the others are busy applying with the rollers.
- Try to use all the epoxy paint.
Left-over paint can however be used to paint the bird and water features in the garden, even without primer.
- Never use epoxy paint to paint humans! Especially watch the children if they are helping; "It's just so much fun to accidentally give sissy a swipe with the roller". Water and soap might proof to be ineffective if left to dry. Leave people black or white or whatever in-between colour they might be. If epoxy ends up on bare skin, remove with spirits within the hour.
- Should the weather interfere at any stage, this should have been foreseen at least 3 hours earlier. The epoxy will become rain resistant after 3-4 hours (25 deg C). Between applications of the different layers, watch the weather, if you smell rain, stop before mixing product for the next layer. Let the existing layers dry overnight until weather allows you to proceed. Sand the hardened layers by hand using p60 sandpaper to create a strong mechanical bond. Then proceed with the application of the next layer.
Disclaimer
Pool Solutions Pty Ltd takes no responsibility for any mishaps, injuries, family fights or divorce action indirectly or directly related to the DIY application of our product. Contact us for a special replacement price for epoxy liquids should you need replacement product for whatever embarrassing reason. Be honest with us, we are always willing to help.
________________________________________________________________________
This was just an overview. Download the instruction manual for the full details.
Send us your comments and feedback. Make a slide show, send a video or photo's, anything we can publish here to encourage other DIY enthusiasts. See the reports and download links published on the right to see how other DIY enthusiast got the job done. (And the challenges they've overcome).
Visit our online pool size calculator and quote request form. We will email you a detailed quote with all the available material and optional items we have on offer.
See our pricelist and quote request form here: Pricelist and Quote Form


